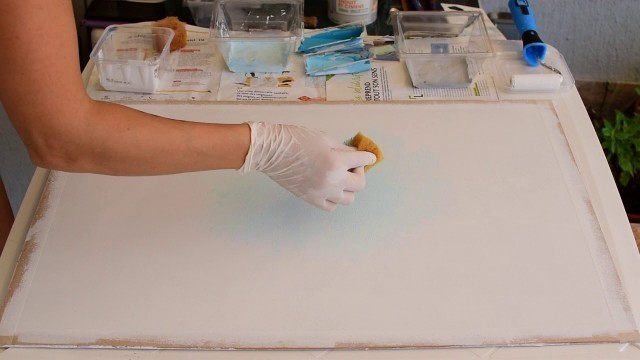

'This video was inspired by tutorials of talented and inspiring Joanie Simon @thebiteshot, as well numerous videos of other creative people. Materials: - Plywood. Typical sizes for food photography backdrops are 50 x 75 cm or 60 x 90cm. Mine was 50 x 70cm. Thickness – 5-12mm, but no less than 5mm (as mine on the video), otherwise plywood will bend from the humidity of applied materials - Paint Primer – mine was thick, the consistency of a paint. On a video I show a tin with a writing in French “Sous Couche”. This is a preparatory coating put on materials before painting. Priming ensures better adhesion of paint to the surface, increases paint durability, and provides additional protection for the material being painted. I applied a thin layer using a roller and it dried fairly quickly. On a video the layer of paint primer has already been applied and dried - Paint. It is preferred to use a Washable Paint. I bought a paint for kitchen (grease resistant paint). Make sure it has a MATTE finish! This is crucial! If the paint is shiny, your photos are going to smile and shine, straight into your lens. You can buy small samples of ready colours or do it my way, I just got a tin of a white paint and colourants to play with tints and intensity of colours - Roller - Porous sponge or coral sponge. You want to benefit from the structure of your sponge to create a visual texture and pattern on the backdrop - Gloves and Containers for paint - Creative Mood Tips and tricks: 1) First, think about the mood of your backdrop (light & airy or dark & moody), a colour palette you want to create. As an inspiration go to the websites of backdrop manufacturers, they have all possible variants. 2) If you applied a paint and you put too much, or you do not like how it looks before it dries use a moist sponge or cloth and just wipe it. Modern paints are much easier to remove. 3) If you have not found washable paint use a normal paint, but I strongly recommend you apply a colourless varnish with a Matte finish. This final layer will protect your backdrop from spitted drinks and food stains. 4) Get creative, play with colours and tints. It is fun and rewarding! ✓✓✓ Фото Фон «Сделай Сам», не фактурный, но с 3мя оттенками синего цвета Материалы: - Лист фанеры. Типичные размеры фото фонов 50 х 75 см или 60 х 90 см. На видео у меня 50 х 70 см. Толщина - 5-12мм, но не меньше, чем 5мм (как у меня на видео), иначе от влажности наносимых материалов фанера выгнется - Грунтовка – у меня она очень густая, консистенция краски. На видео показываю её в самом начале, называется во Франции “Sous Couche”. Это предварительный слой перед покраской, улучшает сцепление между поверхностью фанеры и слоем краски, предотвращая отслоение краски. Грунтовка сохнет довольно быстро, так как наношу её очень тонким слоем, используя валик. На видео грунтовка уже нанесена и высохла - Краски – желательно Моющиеся!!! Я брала те, которые используют для покраски кухонь. Только МАТОВЫЕ! Если краска с блеском, то на фотографии ваш фон будет сверкать и сиять. С цветом есть два варианта – или купить белую краску и отдельно красители для окрашивания самим в разные оттенки, или уже готовые цветные краски - Валик - Мочалка или губка, пористая. С помощью её текстуры мы создаём свой рисунок и придаём визуальную фактурность нашему фону - Перчатки и Контейнеры для красок - Творческое настроение Полезные советы: • Предварительно обдумайте какую тональность (светлую/темную), цветовую палитру вы хотите создать. Можно поискать вдохновение на сайтах производителей фото фонов. • Если вы нанесли краску и вам не понравилось, как она смотрится, или нанесли слишком много – пока краска не высохла, её можно быстро смыть простой влажной губкой или тряпкой. • Если не нашли Моющиеся краски, то можно использовать другие, но в конце стоит покрыть ваш фон бесцветным лаком с МАТОВЫМ эффектом. Это нужно для того, чтобы вы могли вытереть ваш фон после работы с едой или напитками во время фотосессии. • Будьте креативны и экспериментируйте с цветами и тональностями. Это интересно и даже весело! https://www.instagram.com/ferventflavours/'
Tags: #foodphotography , #diybackdrop , #diybackgroud , #diyfoodphotobackgroud , #foodphotobackdrop , #foodphotobackground , #backdrops , #photobackdrop , #backdropsphotography , #фотофон , #фотофонсвоимируками , #фудфотография , #fondphoto
See also:

comments